🛠️ Upgrade your ride’s heartbeat with the ultimate CV boot kit—because your car deserves the best!
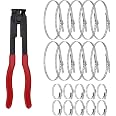
The Bailcast CVS18 Universal Split Constant Velocity Joint Gaiter Boot Replacement Kit offers a versatile, durable solution for protecting CV joints across a wide range of vehicles. Featuring a universal, stretchable design that fits shafts from 18-34mm and joints from 60-116mm, this kit includes all necessary tools and adhesive for a secure, long-lasting repair. Resistant to oil, grease, abrasion, and extreme conditions, it’s engineered for DIY mechanics seeking professional-grade performance and reliability.


| Manufacturer | Bailcast |
| Brand | Bailcast |
| Model | CVS18 |
| Package Dimensions | 13.3 x 10.1 x 9.6 cm; 290 g |
| Item model number | CVS18 |
| Manufacturer part number | CVS18 |
| Item Weight | 290 g |
N**A
Soooooo easy!!
I thought these were too good to be true, but they really are extremely good. I bought 2 as I'd never used them before and I thought there was bound to be a bit of a knack to fitting them. I removed the old CV boot and cleaned out the old grease from the joint. before applying the supplied packet to grease to the joint, I cut the new boot to size, and put it around the drive shaft. It was quite tricky to cut, but managed best with a sharp pair of scissors rather than a stanley knife. I positioned the boot about 15cm away from the joint so that I didn't contaminate the joint to be glued with grease. I practiced holding the joint together before applying the glue, and it was relatively easy to get it aligned. There is a tongue and groove type edge which helped, but I think it could be a little deeper to make it easier to align. Once I was happy, I opened the glue, and started at the small end by applying about 20mm along the edge. I then held the joint together for about a minute. This was quite tricky as the boot had to snuggly fit around the drive shaft. Once this was done, I applied another 20mm of glue, and held the next section in place. This was easier as there was no stretching to be done. I carried on all the way along the joing doing 20mm at a time. DO NOT try and do the whole joint at once, you WILL NOT be able to line up the whole joint and hold it together at the same time. I checked the joint, which looked nice and strong, and then used the pack of grease to pack out the CV joint. I then pulled the boot over the joint and fitted the boot clamp. You will need to use clamp ear pliers to tighten the clamp otherwise it will be a right royal pain in the axxx. I took it for a test drive, and checked when I got home, the boot had slipped off of the CV joint. The mistake I had made it that I hadn't cut the correct amount off of the large end and so the boot was slightly larger that the CV joint. I thought the clamp would tighten it, but it didn't.I tried to cut the boot while it was fitted to the driveshaft, but it was really difficult and grease was getting everywhere. I decided to bite the bullet and use the 2nd boot that I bought. I tried to pull the fitted boot apart, but I couldn't break the join. The glue really had done a good job. So I cut it off, cleaned the grease off, and started again.This time I cut enough off of the large end of the of the boot so that once it was glued, I had to stretch it slightly over the CV joint. I fitted a new clamp, and took it for another drive. Inspection when I came back revealed it was still in place.A month later the car had an MOT, and it passed without any comments on the CV boot. I even highlighted it to the garage before the MOT and they were happy with the fit.I will definitely be using these on all my cars in future. Why pay a garage over £100 for a CV boot replacement, when you can do it yourself without removing the hub. It really was an easy job once I'd mastered it!!Edited 01/11/23So, I've just used these on both sides of a 2006 Seat Leon (the previous use was on a 2006 corsa). A couple of points to make things easier when you use them... firstly, the clamps that come in the kit have really shallow bits to squeeze with the pliers, so much so that you will be f'ing and blinding. Now it could well be my ear pliers weren't the best, but I bought a batch of CV boot clamps (again from amazon) and these have bigger ears on them to squeeze. You'd be well advised to do the same, it makes life much easier.Secondly, I didn't feel there was quite enough grease in the kit so supplemented it will some extra CV grease. I did completely clean out the joint of old grease, so maybe that's why I needed more. I used brake cleaner to completely clean the joint out before re-packing.Thirdly, on the Seat Leon on one of the drive shafts I had to modify how I fitted one side. Previously I started with the small end, gluing about 20mm at a time. On the drivers side of the Leon the drive shaft is thicker towards the engine, so it's not possible to glue the whole boot away from the CV joint. In this case I started at the larger end of the boot, and once the first 20mm was set, I fitted it over the CV joint. Then I just continued gluing 20mm at a time. This worked quite well and managed to do the whole thing from jacking the car to removing the jack in about 20-30 minutes... this was in the pouring rain (sons MOT was due the next morning and he failed to give me warning).I still whole heartedly highly rate these things and will continue to use them. For almost a £100 saving per boot, you can't complain!!One last thing, there is definitely a knack to doing them, but once you master it, they're brilliant!
S**C
Great fix - a bit fiddly
Product did exactly what it claims to do and works well. I was sceptical about how strong the glue would be and if it would hold properly - but it's actually super strong and seals the joint perfectly. Trimming the boot to size was easy as I used the old boot as a size guide and then a sharp blade to remove the excess areas. Take your time with the glue - don't try and glue the whole length of the joint at once - you'll never manage to locate the whole thing before the glue dries. I glued about 20mm at a time and took it slow and steady. Make sure everything is clean before you start - I used brake cleaner to de-grease the boot before I glued it. The addition of the CV grease in the kit is a nice bonus and then the metal retainers go on with relative ease - I did invest in a tool to tighten these clips and for £8 it did a proper job. A nice alternative to a £200+ garage bill to have the hub off and should pass next MOT. Be safe - Don't forget to use axle stands and not just rely on a hydraulic jack is always my advice as you need to pull and push the car a bit whilst fitting. Took me a total of 1 hour to fit.
P**P
Has its shortcommings but benefits outweighed for me.
UPDATED: It's tricky to fit, you need to take the wheel off unless you have a pit to work in. The tongue and grooves could do with being a bit deeper to be honest, they seem a bit shallow and after fitting I seem to have very slight grease seepage out, probably where I have a slight gap in the line of adhesive. I would advise doing a periodic check if you have one of these fitted, even just for grease splatter around the wheel arch or inside the wheel, then checking more closely if you do see specks of grease in either of these areas. The clips (ear clamps) require a special tool to secure them. Invest the money and buy a good tool (eg. Laser), I used various other tools included blunted pliers, don't waste your time, they don't work as the centre of the crimp needs to be pushed in to stop it springing back open at a later date. If you use cling film to cover the exisitng grease - don't forget to take it off before you fix the clips (I forgot - doh!). Also, the ear clamps/clips that come with this product are inferior quality compared to what the vehicle manufacturers fit. If you are removing the original boot, check how much thicker the originals are and how the three hooks are larger, deeper and at least one is "L" shaped (usually the end one at least). I had two attempts with Bailcast quality clips, 1 flew off becuase it was too long and therefore overlapped too much plus the three hooks were too small and 1 failed at the crimp point becuase it couldn't handle the pressure from the Laser crimping tool. Look for heavy duty ear clamps/clips similar to those sold by P&A Auto Tools, well worth the additional spend to save you loads of time having to refit clips (and worst case when the clip comes off you'll have to refit another boot like I did when the bearings mangled it). Despite all of the above, I would recommend and use this product again. For under £10 it saves you the labour costs of a garage and dismantling the driveshaft (I used this product because the other CV boot got replaced on my car and the garage only used cable ties and the driveshaft had lateral movement after their work was done, nothing like doing a job yourself if you want it done properly as they say). This product also got the car through the MOT with no issues, which was the main objective for me. If this product came with proper heavy duty car manufacturer spec ear clips, it would get 5 stars from me, even if the product therefore cost slightly more.
Trustpilot
2 weeks ago
2 weeks ago